Classrooms with Webcam
Atualizado/Updated: 2024-12-20


These classrooms are prepared for classes and other events in a hybrid environment

1 – The connection of the computer (room desktop or laptop) to the video projection and videoconferencing systems is ensured by a single USB 3.0 cable.
2 – Control System
The control system allows you to turn the video projector on and off.

Video call
- Full HD 1080p (up to 1920 x 1080 pixels)
- 720p HD (up to 1280 x 720 pixels)
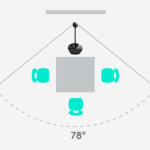
Field of view
- Diagonal: 78°
- Horizontal: 70.42 °
- Vertical: 43.3 °
One-way microphone
- Range: 2.4 m in diameter
- Frequency response: 200Hz – 8KHz
Speaker
- Frequency response: 220Hz – 20KHz
- Max output: 80 dB SPL @ 0.3m
The VGA switcher allows you to switch the projection source between the auditorium desktop and a laptop.
- Input A – Connected to the auditorium computer (audio and video)
- Input B – To connect a second computer/laptop
- Output (I/O) – Connected to the video projector
To project the contents of the laptop, do the following:
- Connect the VGA cable labeled “Connect laptop” to the laptop.
- Press the B input button.


Tip: Devices without analog output require adapters for VGA.
- 7-Zip
- Adobe Flash Player 32 NPAPI
- Adobe Flash Player 32 PPAPI
- EViews 10
- Google Chrome
- IBM SPSS Statistics
- MATLAB R2019a
- Microsoft Office Professional Plus 2019 – en-us
- Microsoft Office Professional Plus 2019 – en-us.proof
- Microsoft Office Professional Plus 2019 – pt-pt.proof
- Mozilla Firefox
- VLC Media Player
- Vulkan Run Time Libraries
- VMware Tools
- Zoom
- If needed, turn on the classroom desktop.
- If you use a laptop, take care of the connection to the VGA switch
- Open the support materials (audio, video, presentations).
- If needed, turn on the video projector using the “ON” button on the control system.
- If needed, open the Zoom client or access the platform via https://videoconf-colibri.zoom.us/ by performing federated authentication (SSO) with the Credentials of the Iscte account (e.g., xxnes and their password).
- Check microphone: BCC950 ConferenceCam.
- Check speaker: BCC950 ConferenceCam.
- Check the causing: BCC950 ConferenceCam.
- If so, start a previously scheduled class and the link of which was sent to the students.
- At the end of the lesson or meeting, end the zoom session, terminate all applications (e.g., powerpoint) or open sessions on platforms (e.g., mail, onedrive, phoenix, e-learning).
- Turn off the video projector using the control system button.
